Events List🔗
Cancel a quest: cancel🔗
This event works in the same way as a quest canceler in the backpack.
Running this event is equal to the player canceling a quest using the backpack.
The only argument is the identifier of a quest canceler, as defined in the cancel section.
cancelQuest: "cancel woodQuest"
Burn: burn🔗
| Parameter | Syntax | Default Value | Explanation |
|---|---|---|---|
| duration | duration:number |
The duration the player will burn (in seconds). Can be a variable. |
events:
  burn: "burn duration:4"
  punishing_fire: "burn duration:%point.punishment.amount%"
Cancel the Conversation: cancelconversation🔗
Cancels the active conversation of the player.
  events:
    cancel: "cancelconversation"
Chat player message chat🔗
This event will send the given message as the player. Therefore, it will look like as if the player did send the message.
The instruction string is the command, without leading slash. You can only use %player% as a variable in this event.
Additional messages can be defined by separating them with | character. If you want to use a | character in the message use \|.
If a plugin does not work with the sudo / command event you need to use this event.
Example
sendMSG: "chat Hello!"
sendMultipleMSGs: "chat Hi %player%|ban %player%|pardon %player%"
sendPluginCommand: "chat /someCommand x y z"
Chest Clear: chestclear🔗
persistent, static
This event removes all items from a chest at specified location. The only argument is a location.
Example
chestclear 100;200;300;world
Chest Give: chestgive🔗
persistent, static
This works the same as give event, but it puts the items in a chest at specified location. The first argument is a location, the second argument is a list of items, like in give event. If the chest is full, the items will be dropped on the ground. The chest can be any other block with inventory, i.e. a hopper or a dispenser. BetonQuest will log an error to the console when this event is fired but there is no chest at specified location.
Example
chestgive 100;200;300;world emerald:5,sword
Chest Take: chesttake🔗
persistent, static
This event works the same as take event, but it takes items from a chest at specified location. The instruction string is defined in the same way as in chestgive event.
Example
chesttake 100;200;300;world emerald:5,sword
Compass: compass🔗
When you run this event, you can add or remove a compass destination for the player. You may also directly set the player's compass destination as well. When a destination is added the player will be able to select a specified location as a target of his compass. To select the target the player must open his backpack and click on the compass icon. The first argument is add,del or set, and second one is the name of the target, as defined in the compass section. Note that if you set a target the player will not automatically have it added to their choices.
The destination must be defined in compass section. You can specify a name for the target in each language or just give a general name, and optionally add a custom item (from items section) to be displayed in the backpack. Example of a compass target:
compass:
  beton:
    name:
      en: Target
      pl: Cel
    location: 100;200;300;world
    item: scroll
Example
compass add beton
Command: command🔗
persistent, static
Runs specified command from the console. The instruction string is the command, without leading slash.
You can use variables here, but variables other than %player% won't resolve if the event is fired from delayed folder
and the player is offline now. You can define additional commands by separating them with | character.
If you want to use a | character in the command use \|.
Looking for run command as player?
Example
command kill %player%|ban %player%
Conversation: conversation🔗
Starts a conversation at location of the player. The first argument is ID of the conversation. This bypasses the conversation permission!
The optional option argument is a NPC option where the conversation will start.
When using this argument the conversation will start without its header.
Example
conversation village_smith
conversation tutorial option:explain_world
Damage player: damage🔗
Damages the player by specified amount of damage. The only argument is a number (can have floating point).
Example
damage 20
Delete Point: deletepoint🔗
persistent, static
Clear all player points in a specified category.
Example
deletepoint npc_attitude
Delete Globalpoint: deleteglobalpoint🔗
persistent, static
Removes the specified category from the global points list.
deleteBonus: "deleteglobalpoint bonus"
Door: door🔗
persistent, static
This event can open and close doors, trapdoors and fence gates. The syntax is exactly the same as in lever event above.
Example
door 100;200;300;world off
Drop Item: drop🔗
static
Drops the defined items at a defined location. The event takes two parameters: items and location.
Items is a list of items to be dropped.
Every item can optionally be followed by a colon to define an amount <item>:<amount> otherwise the amount is 1.
The optional location defines where the items will be dropped. It must be specified in the unified location format.
If no location is given then the items will be dropped at the player's current location.
If the drop event is used in a schedule then the items will be dropped at the given location. If no location is given then the items will be dropped for every player at their respective locations.
drop items:magical_sword location:200;17;300;world
drop items:loot_rare,loot_common:3
drop items:myItem location:%objective.MyQuestVariables.DropLocation%
Remove Potion Effect: deleffect🔗
Removes the specified potion effects from the player. Use any instead of a list of types to remove all potion effects from the player.
Alternatively to any, you just can leave it blank.
Example
deleffect ABSORPTION,BLINDNESS
deleffect any
deleffect
Potion Effect: effect🔗
Adds a specified potion effect to player. First argument is potion type. You can find all available types here. Second is integer defining how long the effect will last in seconds. Third argument, also integer, defines level of the effect (1 means first level). Add a parameter ambient to make potion particles appear more invisible (just like beacon effects). To hide particles add a parameter hidden. To hide the icon for the effect add noicon.
Example
effect BLINDNESS 30 1 ambient icon
Give experience: experience🔗
This event allows you to manipulate player's experience. First you specify a number as the amount, then the modification action.
You can use action:addExperience, action:addLevel, action:setExperienceBar and action:setLevel as modification types.
To use this correctly, you need to understand this:
- A player has experience points.
- Experience levels, shown are shown as a number in the experience bar. Every level requires more experience points than the previous.
- The experience bar itself shows the percentage of the experience points needed to reach the next level.
While action:addExperience only adds experience points, action:addLevel adds a level and keeps the current percentage.
action:setExperienceBar sets the progress of the bar. Decimal values between 0 and 1 represent the fill level.
This changes the underlying experience points, it's not just a visual change.
action:setLevel sets only the level, expect if you specify a decimal number, then the experience bar will be
set to the specified percentage.
add15XP: "experience 15 action:addExperience"
add4andAHalfLevel: "experience 4.5 action:addLevel"
remove2Level: "experience -2 action:addLevel"
setXPBar: "experience 0.5 action:setExperienceBar"
resetLevel: "experience 0.01 action:setLevel"
Explosion: explosion🔗
persistent, static
Creates an explosion. It can make fire and destroy blocks. You can also define power, so be careful not to blow your server away. Default TNT power is 4, while Wither on creation is 7. First argument can be 0 or 1 and states if explosion will generate fire (like Ghast's fireball). Second is also 0 or 1 but this defines if block will be destroyed or not. Third argument is the power (float number). At the end (4th attribute) there is location.
Example
explosion 0 1 4 100;64;-100;survival
Run multiple events: folder🔗
persistent, static
This event wraps multiple events inside itself. Once triggered, it simply executes it's events. This is usefully to easily refer to a bunch of events at once, e.g. in a conversation.
Events marked as persistent will be fired even after the player logs out.
Beware though, all conditions are false when the player is offline (even inverted ones),
so those events should not be blocked by any conditions!
You can use the cancelOnLogout argument to stop the folder executing any remaining events if the player disconnects.
| Parameter | Syntax | Default Value | Explanation |
|---|---|---|---|
| events to run | eventName1,event2 | One or multiple events to run. Contains event names seperated by commas. | |
| delay | Keyword | without delay | The delay before the folder starts executing it's events. |
| period | period:number | without delay | The time between each event of the folder. |
| time unit | Keyword | Seconds | The unit of time to use for delay and period. Either ticks or minutes. Omit to use seconds. |
| random | random:number | Disabled | Enables "random mode". Will randomly pick the defined amount of events . |
| cancelOnLogout | Keyword | Disabled | If enabled, the folder will stop executing events if the player disconnects. |
events:
  simpleFolder: "folder event1,event2,event3" # (1)!
  runEvents: "folder event1,event2,event3 delay:5 period:1" # (2)!
  troll: "folder killPlayer,banPlayer,kickPlayer delay:5 random:1" # (3)!
  wait: "folder messagePlayer,giveReward delay:1 minutes" # (4)!
- Runs all events after one tick with a delay of one tick between each event.
- Runs
event1after an initial delay of 5 seconds, then waits one second before executing each leftover event. - Randomly executes one of the three events after 5 seconds.
- Executes the events after one minute.
If-else through a list of events: first🔗
This event wraps multiple events inside itself, similar folder. Unlike folder, it attempts to execute each event,
starting from the first onward. Once it successfully executes one event, it stops executing the rest. This is useful for
collapsing long if-else chains into single events.
This event is especially powerful when it is used in conjunction with the condition: keyword,
which can be used with any event.
events: # (1)!
  firstExample: "first event1,event2,event3"
  event1: "point carry boxes 10 action:add condition:firstCondition"
  event2: "point carry boxes 20 action:add condition:secondCondition"
  event3: "point carry boxes 40 action:add condition:thirdCondition"
- If firstCondition is false, secondCondition is true, and thirdCondition is true, event2 is the only event that will be run.
events:
  firstExample: "if firstCondition event1 else firstExample2"
  firstExample2: "if secondCondition event2 else firstExample3"
  firstExample3: "if thirdCondition event3"
  event1: "point carry boxes 10 action:add"
  event2: "point carry boxes 20 action:add"
  event3: "point carry boxes 40 action:add"
Give Items: give🔗
Gives the player predefined items. They are specified exactly as in item condition -
list separated by commas, every item can have amount separated by colon. Default amount is 1.
If the player doesn't have required space in the inventory, the items are dropped on the ground,
unless they are quest items. Then they will be put into the backpack. You can also specify notify keyword to display a
simple message to the player about receiving items.
The optional backpack argument forces quest items to be placed in the backpack.
Example
give emerald:5,emerald_block:9
give important_sign notify backpack
Give journal: givejournal🔗
This event simply gives the player his journal. It acts the same way as /j command would.
Example
givejournal
Global point: globalpoint🔗
persistent, static
This works the same way as the normal point event but instead to manipulating the points for a category of a specific player it manipulates points in a global category. These global categories are player independent, so you could for example add a point to such a global category every time a player does a quest and give some special rewards for the 100th player who does the quest.
Example
globalpoint global_knownusers 1 action:add
globalpoint daily_login 0 action:set
globalpoint reputaion 2 action:multiply
Global tag: globaltag🔗
persistent, static
Works the same way as a normal tag event, but instead of setting a tag for one player it sets it globally for all players.
Example
globaltag add global_areNPCsAgressive
Hunger: hunger🔗
This event changes the food level of the player. The second argument is the modification type.
There are give, take and set. The second argument is the amount. With set can the food level be anything.
If give or take is specified the final amount won't be more than 20 or less than 0.
If the hunger level is below 7, the player cannot sprint.
Example
hunger set 20
hunger give 5
If else: if🔗
persistent, static
This event will check a condition, and based on the outcome it will run the first or second event. The instruction
string is if condition event1 else event2, where condition is a condition ID and event1 and event2 are event IDs.
else keyword is mandatory between events for no practical reason. Keep in mind that this event is persistent
and static but probably the condition or the events are not.
Example
if sun rain else sun
Item durability: itemdurability🔗
Adds or removes durability from an item in the slot.
The first argument is the slot, the second the change of durability and the third the amount.
Optional arguments are ignoreUnbreakable to ignore the unbreakable flag and unbreaking enchantment
and ignoreEvents to bypass event logic, so other plugins will not be able to interfere.
Available slot types: HAND, OFF_HAND, HEAD, CHEST, LEGS, FEET.
Info
Both increasing and decreasing durability will be affected by the unbreaking enchantment.
To prevent this behaviour use the ignoreUnbreakable argument.
Example
itemdurability HAND ADD 1
itemdurability CHEST SUBTRACT %randomnumber.whole.15~30% ignoreUnbreakable ignoreEvents
Journal: journal🔗
static
Adds or deletes an entry to/from a player's journal. Journal entries have to be defined in the journal section. The
first argument is the action to perform, the second one is the name of the entry if required. Changing journal entries
will also reload the journal.
Possible actions are:
- add: Adds a page to the journal.
- delete: Deletes a page from the journal.
- update: Refreshes the journal. This is especially useful when you need to update the main page.
Example
journal add quest_started
journal delete quest_available
journal update
Kill: kill🔗
Kills the player. Nothing else.
Language Event: language🔗
persistent
This event changes player's language to the specified one. There is only one argument, the language name.
Example
language en
Lever: lever🔗
persistent, static
This event can switch a lever. The first argument is a location and the second one is state: on, off or toggle.
Example
lever 100;200;300;world toggle
Lightning: lightning🔗
static
Strikes a lightning at given location. The first argument is the location. By adding noDamage the lightning is only
an effect and therefor does no damage.
events:
  strikeLightning: lightning 100;64;-100;survival
  showEntrance: lightning 200;65;100;survival noDamage
Sending Notifications: notify🔗
You can send notifications using the notify event. This is how to use it:
Warning
All colons (:) in the message part of the notification need to be escaped, including those inside variables.
One backslash (\) is required when using no quoting at all (...) or single quotes
('...'). Two backslashes are required (\\) when using double quotes ("...").
You also need to escape the backslash itself, if you use double quotes for some things like \n.
Examples:
eventName: notify Peter:Heya %player%! 
eventName: notify Peter\:Heya %player%!
eventName: 'notify Peter:Heya %player%!' eventName: 'notify Peter\:Heya %player%!'
eventName: "notify Peter:Heya %player%!" eventName: "notify Peter\\:Heya %player%!"
otherEvent: notify You own %math.calc:5% fish! otherEvent: You own %math.calc\:5% fish!
newLine: "notify Some multiline \n message" newLine: "notify Some multiline \\n message"
| Parameter | Syntax | Default Value | Explanation |
|---|---|---|---|
| message | Any text with spaces! | The message that will be displayed. Supports variables and translations. Must be first | |
| category | category:info |
None | Will load all settings from that Notification Category. Can be a comma-seperated list. The first existent category will be used. |
| io | io:bossbar |
io:chat | Any NotifyIO Overrides the "category". settings. |
| any io specific settings | setting:value |
None | Some notifyIO's provide specific settings. Can be used multiple times. Overrides the "category" settings. |
Usage Examples🔗
Check out the notify IO specific options if you haven't yet. You must understand these two if you want to use the Notify system to it's full extend. Advanced users may also use Notify Categories to make their lives easier.
#The simplest of all notify events. Just a chat message:
customEvent: "notify Hello %player%!"

#It's the same as this one since 'chat' is the default IO.
theSame: "notify Hello %player%! io:chat"

#This one displays a title and a subtitle:
myTitle: "notify This is a title.\nThis is a subtitle. io:title"

#Plays a sound:
mySound: "notify io:sound sound:x.y.z"

#This one explicitly defines an io (bossbar) and adds one bossbarIO option + one soundIO option:
myBar: "notify This is a custom message. io:bossbar barColor:red sound:block.anvil.use"

#Some events with categories.
myEvent1: "notify This is a custom message! category:info"
myEvent2: "notify This is a custom message! category:firstChoice,secondChoice"

#You can also override category settings:
myEvent3: "notify Another message! category:info io:advancement frame:challenge"

#Use multiple languages:
multilanguage: "notify {en} Hello english person! {de} Hello german person! {es} Hello spanish person!"
Translations🔗
Notifications can be translated with this syntax:
example: "notify {en} ABC {de} DEF"
{} is a language key from messages.yml. Any text after the language key until the next language key
belongs to the specified language. There must be a space between the language key and the message.
In this example, english users would see ABC and german ones would see DEF.
Broadcasts🔗
persistent, static
You can broadcast notifications to all players on the server using the notifyall event. It works just like the notify event.
Variables are resolved for each online player, not for the player the event is executed for.
events:
  announceDungeon: "notifyall A new dungeon has opened!"
Log message to console: log🔗
persistent, static
Prints a provided message to the server log. Any variables used in the message will be resolved. Note that when used in static context (by schedules) replacing player dependent variables won't work as the event is player independent.
| Parameter | Syntax | Default Value | Explanation |
|---|---|---|---|
| level | level:logLevel |
INFO |
Optionally the log level can be specified but only before the message. There are 4 levels: debug, info, warning and error |
  events:
    logPlayer: "log %player% completed first quest."
    debug: "log level:DEBUG daily quests have been reset"
Objective: objective🔗
persistent, static
Adds, removes or completes the specified objective(s).
| Parameter | Syntax | Default Value | Explanation |
|---|---|---|---|
| action | Keyword: add,remove,complete |
The action to do with the objective(s). | |
| objective(s) | objectiveName or obj1,obj2 |
The objective(s) to run the action on. |
Using this in static contexts only works when removing objectives!
events:
  startQuest: "objective add killTheDragon,goToDungeon"
  progressQuest: "objective complete killTheDragon"
OPsudo: opsudo🔗
This event is similar to the sudo event, the only difference is that it will fire a command as the player with temporary OP permissions.
Additional commands can be defined by separating them with | character. If you want to use a | character in the message use \|. Variables are supported.
Looking for run as normal player? Looking for console commands?
Example
opsudo spawn
Party event: party🔗
This is part of the party system.
Runs the specified list of events (third argument) for every player in the party.
The last optional argument amount specifies a maximum number of players to select.
Selected players will be picked from the party if they are in range and meet the conditions.
Players are selected according to their distance from the player who triggered the event.
For example, if the 'amount' is two, the player who triggered the event and the player closest to that player will be selected.
A negative amount will select all players and therefore act as if there was no amount given.
Example
party 10 has_tag1,!has_tag2 give_reward
party 10 has_tag1,!has_tag2 give_special_reward amount:3
Pick random: pickrandom🔗
persistent, static
Another container for events. It picks one (or multiple) of the given events and runs it. You must specify how likely it is that each event is picked by adding the percentage before the event's id. The event won't break if your total percentages are above 100%.
It picks one event from the list by default, but you can add an optional amount: if you want more to be picked.
Note that only as many events as specified can be picked and amount:0 will do nothing.
There must be two %% before the event's name if variables are used, one is from the variable and the other one from the event's syntax.
Example
pickrandom 20.5%event1,0.5%event2,79%event3 amount:2
pickrandom %point.factionXP.amount%%event1,0.5%event2,79%event3,1%event4 amount:3
Point: point🔗
persistent
This event allows you to manipulate player's points in a specified category. First you can specify a number of points,
then the modification action. For that, you can use action:add, action:subtract, action:set and action:multiply
as modification types. This event also supports an optional notify argument that will display information about the
change using the notification system.
gainAttitude: "point npc_attitude 5 action:add"
loseAttitude: "point npc_attitude 2 action:subtract"
resetCombo: "point combo 0 action:set"
boostPoints: "point points 1.25 action:multiply notify"
Remove entity: removeentity🔗
persistent, static
Removes or kill all entities (mobs) of given type at the location. Here you can look up all type's of entity's.
Can only effect loaded entities!
| Parameter | Syntax | Default Value | Explanation |
|---|---|---|---|
| entity(s) | entity,entity |
Required. List of entity's (separated by ,). |
|
| location | Unified Location Formatting | Required. The center location of the target entity's. | |
| radius | Number | Required. The radius around the location. Can be a variable. | |
| name | name:name |
Name of the entity. All _ will be replaced with spaces. |
|
| marked | marked:mark |
Mark of the entity (form the spawn event for example). Can be a variable. | |
| kill | kill |
Whether to remove or actually kill the entity (if possible). |
killArenaMobs: "removeentity ZOMBIE 100;200;300;world 10 name:Monster kill"
clearGameArea: "removeentity ARROW,SNOWBALL,WOLF,ARMOR_STAND 100;200;300;world 50 marked:minigame"
Run events: run🔗
persistent, static
This event allows you to specify multiple instructions in one, long instruction. Each instruction must be started
with the ^ character (it divides all the instructions). It's not the same as the folder event, because you have to
specify the actual instruction, not an event name.
Don't use conditions here, it behaves strangely.
Example
run ^tag add beton ^give emerald:5 ^entry add beton ^kill
Run events for all online players: runForAll🔗
persistent, static
Runs the specified event (or list of events) once for each player on the server.
The most common use case is to run an event for all online players from a schedule. But you can also use it in conversations, objectives or other events.
To run the events only for a selection of players, use the where: option to filter for players that meet specific conditions.
| Parameter | Syntax | Default Value | Explanation |
|---|---|---|---|
| events | events:events |
Required. The events to be run, separated by ,. |
|
| where | where:conditions |
A list of optional conditions (separated by ,) that are checked for every player. The events supplied in events: are only executed for the players that meet all the given conditions. |
events:
    kickAll: "runForAll where:!isOp events:kickPlayer,restartQuest"
Warning
You can still append conditions to the runForAll event (e.g. runForAll events:kickPlayer conditions:!isOp).
This won't check the conditions for each player!
Instead it will check the conditions for the player that triggered the event or check them player independent if triggered player independent (e.g. by a schedule).
Run events player independent: runIndependent🔗
persistent, static
Runs the specified event (or list of events) player independent (as if it was run from a schedule).
This is usefully for events that behave differently when run player independent.
Events that behave different if run player independent
tag delete- deletes the tag for all players in the database (even if offline)objective remove- removes the objective for all players in the database (even if offline)journal delete- deletes the journal entry for all players in the database (even if offline)deletepoint- clears points of a given category for all players in the database (even if offline)
| Parameter | Syntax | Default Value | Explanation |
|---|---|---|---|
| events | events:events |
Required. The events to be run, separated by ,. |
events:
    resetQuestForAll: "runIndependent events:removeObjective,clearTags,resetJournal"
Warning
There are a lot of events and conditions that cannot be run (or checked) player independent.
If you try to run such an event player independent (or check such a condition) this won't work,
and you will get an error message in the console.
For more information on player independent events check this.
Scoreboard: score🔗
persistent
This event works in the same way as point, the only difference being that it uses scoreboards instead of
points. You can use action:add, action:subtract, action:set and action:multiply to change the value.
It's only possible to change the value, you have to create the scoreboard target first.
gotKill: "score kill 1 action:add"
gotKilled: "score kill 1 action:subtract"
resetKill: "score kill 0 action:set"
applyBonus: "score kill 1.2 action:multiply"
Set Block: setblock🔗
persistent, static
Changes the block at the given position.
The first argument is a Block Selector, the second a location. It's possible to
deactivate the physics of the block by adding ignorePhysics at the end.
Very powerful if used to trigger redstone contraptions.
Example
setblock REDSTONE_BLOCK 100;200;300;world
setblock SAND 100;200;300;world ignorePhysics
Modify Stage: stage🔗
You can set, increase or decrease the player's stage. The objective will not automatically complete when using set.
By increasing it the player will be able to complete the objective. When increasing or decreasing the stage
you can optionally specify an amount to increase or decrease by.
When decreasing the objective it will do nothing when the first stage is reached.
When the conditions of the stage objective are not met, the stage of the player can not be modified.
For more take a look at the stage objective.
| Parameter | Syntax | Default Value | Explanation |
|---|---|---|---|
| stage objective | Objective | The name of the stage objective | |
| action | set, increase or decrease |
The action to perform | |
| stage | Stage | The name of the stage to set when set is used |
|
| amount | Number | 1 | The amount to increase or decrease by |
events:
  setCookCookies: "stage bakeCookies set cookCookies"
  increase: "stage bakeCookies increase"
  decrease2: "stage bakeCookies decrease 2"
Spawn Mob: spawn🔗
persistent, static
Spawns specified amount of mobs of given type at the location. First argument is a location. Next is type of the mob. The last, third argument is integer for amount of mobs to be spawned. You can also specify name: argument, followed by the name of the mob. All _ characters will be replaced with spaces. You can also mark the spawned mob with a keyword using marked: argument supporting variables. It won't show anywhere, and you can check for only marked mobs in mobkill objective.
You can specify armor which the mob will wear and items it will hold with h: (helmet), c: (chestplate), l: (leggings), b: (boots), m: (main hand) and o: (off hand) optional arguments. These take a single item without amount, as defined in the items section. You can also add a list of drops with drops: argument, followed by a list of items with amounts after colons, separated by commas.
Example
spawn 100;200;300;world SKELETON 5 marked:targets
Example
spawn 100;200;300;world ZOMBIE name:Bolec 1 h:blue_hat c:red_vest drops:emerald:10,bread:2
Sudo: sudo🔗
This event is similar to command event, the only difference is that it will fire a command as the player (often referred to as player commands).
Additional commands can be defined by separating them with | character. If you want to use a | character in the message use \|. Variables are supported.
Looking for run as op? Looking for console commands?
Example
sudo spawn
Tag: tag🔗
persistent, static
This event adds a tag to or deletes a tag from the player. The first argument after event's name must be
add or delete. Next goes the tag name. It can't contain spaces (though _ is fine).
Multiple tags can be added and deleted separated by commas (without spaces).
Example
tag add quest_started,new_entry
Take Items: take🔗
Removes items from the player’s inventory, armor slots or backpack.
The items itself must be defined in the items section, optionally with an amount after a colon.
Which inventory types are checked is defined by the invOrder:
option. You can use Backpack, Inventory, Offhand and Armor there. One after another will be checked if multiple types are defined.
Note: If the items aren't quest items don't use takeevent with player options in conversations!
The player can drop items before selecting the option and pickup them after the event fires.
Validate it on the NPC’s reaction!
You can also specify notify keyword to display a simple message to the player about loosing items.
Example
take emerald:120,sword
take nugget:6 notify
take wand notify invOrder:Backpack
take money:50 invOrder:Backpack,Inventory
take armor invOrder:Armor,Offhand,Inventory,Backpack
Time: time🔗
persistent, static
Changes the time of the world. The time is represented in 24 hours format as a float number, so 0 is midnight, 12 is
noon and 23 is 11 PM. For minutes, you can use floating point numbers, so 0.5 is half past midnight, 0.25 is quarter
past midnight and so on. (0.1 hours is 6 minutes). It's possible to add or subtract time by using + or - prefix or
to set the time by setting no prefix.
Additionally, you can specify the world in which the time will be changed, by adding world:.
Using the ticks argument changes the time like the vanilla command.
Example
time 6
time +0.1
time -12 world:rpgworld
time +%randomnumber.whole.100~2000% world:pvpworld ticks
Teleport: teleport🔗
Teleports the player to the specified location. Ends any active conversations.
Do you only want to cancel the conversation?
| Parameter | Syntax | Default Value | Explanation |
|---|---|---|---|
| location | Unified Location Formatting | The location to which the player will be teleported. |
events:
  toCity: "teleport 432;121;532;world" # (1)!
  toHell: "teleport 123;32;-789;world_the_nether;180;45" # (2)!
- Teleports the player to X: 432, Y: 121, Z: 532 in the world named 'world'.
- Teleports the player to X: 123, Y: 32, Z: -789 in the world named 'world_the_nether'. Also sets the head rotation to yaw 180 and pitch 45.
Variable: variable🔗
This event has only one purpose: Change values that are stored in variable objective variables. The first argument is
the ID of the variable objective. The second argument is the name of the variable to set. The third argument is the
value to set. Both the name and value can use %...% variables. To delete a variable you can use "". Refer to the
variable objective documentation for more information about
storing variables. This event will do nothing if the player does not already have a variable objective assigned to them.
Example
variable CustomVariable MyFirstVariable Goodbye!
variable variable_objectiveID name %player%
variable other_var_obj desc ""
Move the player: velocity🔗
| Parameter | Syntax | Default Value | Explanation |
|---|---|---|---|
| vector | vector:(x;y;z) |
The values of the vector, which are decimal numbers, can be interpreted as absolute numbers like the coordinate or as relative directions. For more understanding the relative direction is similar to ^ ^ ^ in minecraft or in other words (sideways;upwards;forwards). Can be a variable. |
|
| direction | direction:directionType |
absolute |
There are 3 types how the vector can get applied to the player:absolute won't change the vector at all.relative will redirect the vector to the view of the player.relative_y is a mix between absolute and relative. It will still direct to the view but only horizontally, so y will be absolute. |
| modification | modification:modificationType |
set |
Possible modifications are set and add. The modification type determines how the vector should be merged with the player's velocity. The player's velocity is the external force applied on the player. |
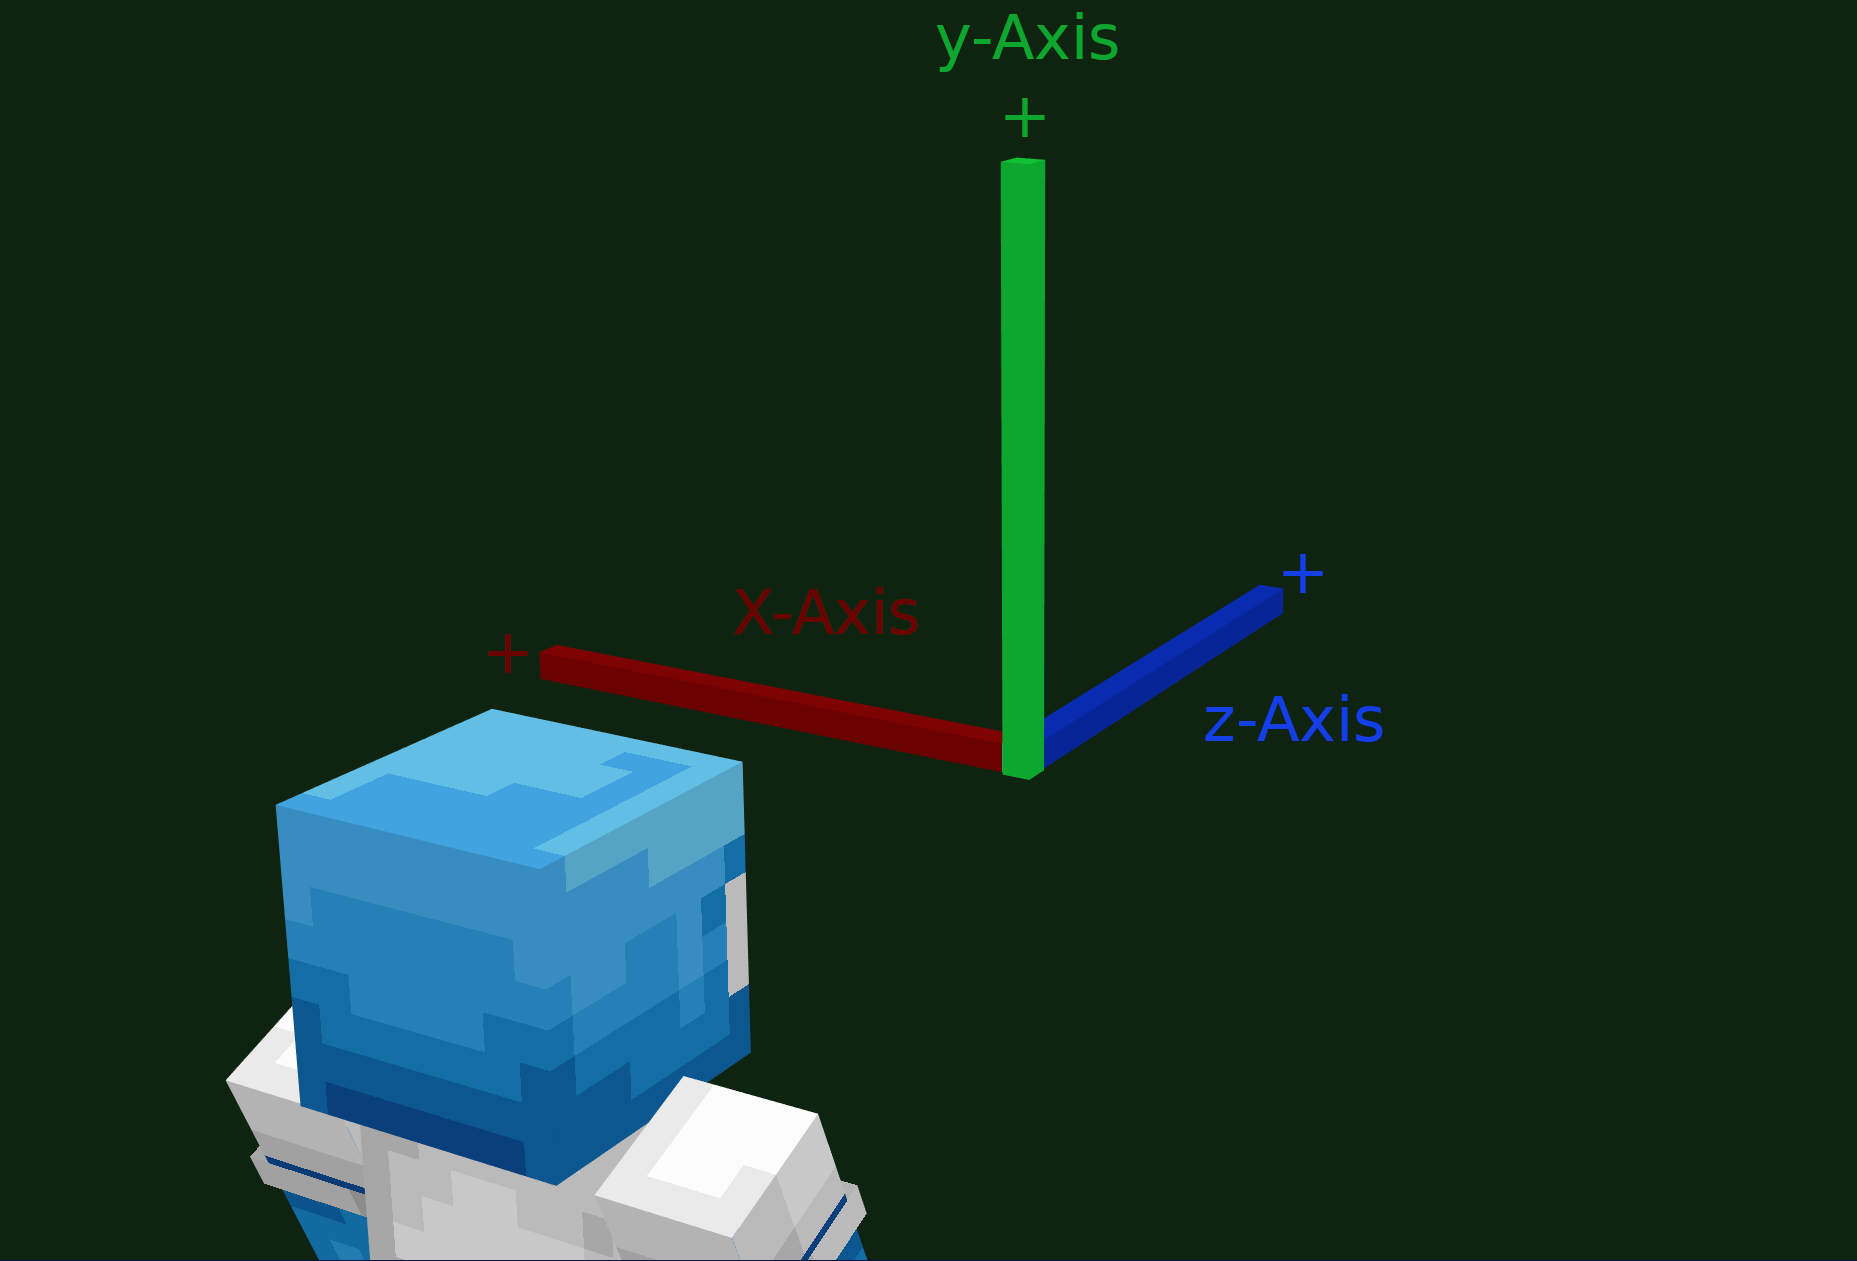
Visual Explanation
In contrast to their global counterparts, relative x,y,z axes do not change their orientation relative to the player. Example: The positive x-axis will always point left from the perspective of the player.
events:
  jumppad: "velocity vector:(2;0.8;4)"
  dash: "velocity vector:(0;0.1;1.3) direction:relative_y"
  variable_dash: "velocity vector:%objective.customVariable.dashLength% direction:relative_y"
  fly: "velocity vector:(0;0.1;2) direction:relative modification:add"
Weather: weather🔗
persistent, static
Sets the weather in the world the player is currently in. The argument is sun for clear, sunny weather, rain for pure rain,
storm for storm with rain, lightning and thunder.
Durations less than 1 is equal to no duration.
| Parameter | Syntax | Default Value | Explanation |
|---|---|---|---|
| type | Keyword | The type of weather to set. Either sun, rain or storm. |
|
| duration | duration:number |
Minecraft decides randomly. | The duration the weather will last (in seconds). Can be a variable. Is handled from minecraft afterwards. |
| world | world:worldName |
The player's current world. | The world to change the weather in. |
events:
  setSun: "weather sun"
  setShortRain: "weather rain duration:60 world:rpgworld"
  setStorm: "weather storm duration:%point.tribute.left:150%"